9.28.2012

Follower Friday: Cowboy Potatoes and Barbeque Chicken

The person chosen for Follower Friday is Shaylin!  We have a lot in common.  We both went to BYU-Idaho and studied to be teachers.  She married my brother's best friend.  (I didn't marry him too - but that's how we originally met!)  We both live in Utah and have daughters named Paige.  I wish we lived closer, but sadly we don't.  It's all yours Shaylin!

------------------------------------------------------------------------------------------------------------------

Hi Tiffanie!  I am so excited to share a recipe with everyone today! My name is Shaylin and I LOVE to cook yummy, easy food!  Especially food that gives my family of four lots of leftovers for the week! I also really like food that I can prepare in the morning so that it's done just in time for dinner without too much fuss.  Plus, having yummy smells in my house all day is always a plus.  Today we are making a recipe that I learned from my mom - one of our favorites!

Cowboy Potatoes and Barbecue Chicken
What you need:
1 lb bacon
1/2 yellow onion, chopped
1/2 small bag of baby carrots
6-8 red potatoes, washed and scrubbed
1/2 bag of frozen peas
1 cup grated cheddar cheese
3 frozen chicken breasts
1/2 bottle of your favorite barbecue sauce

 Cut the bacon into 3/4 inch pieces and cook in a frying pan until almost done.  Add the chopped onion and cook until the onions are nice and soft.

While that is cooking, cut the potatoes and carrots into bite size pieces and put them in your crock pot.

When the bacon and onions are done, dump them into your crock pot too - bacon grease and all.  Yummy!  Cook this in your crock pot on high for about 7 hours - or until they are nice and soft.
When they are soft, add the peas and cook for another 20-30 minutes.  Finally, add the cheese and let it cook just long enough for the cheese to melt on top.

After you get the potatoes and carrots cooking for the day, put the frozen chicken into a baking dish and cover it with the barbecue sauce.  Add about an inch of water to the bottom of the baking dish - you don't want your chicken to dry out!

  Cover with aluminum foil and bake in the oven at 275 degrees for 6 to 7 hours. It should easily fall apart when it is done.

As far as I'm concerned - these two items ALWAYS go together - they are just so good together.  Whip up a salad or some rolls and you have a dinner to die for!
-----------------------------------------------------------------------------------------
Looks delicious!  The PERFECT meal for a crisp fall day.  The bacon won me over :)  Happy weekend!

9.26.2012

Frozen Strawberry Lemonade

I know summer is over, but this is my ALL time favorite summer drink. 
And I was just introduced to it at the end of this summer.  So I'm still making it.

My friend, Kim came to help me pack (she's amazing!) and she made this for me. 
I was hooked.  I hope you are too.

Frozen Strawberry Lemonade
(this is one serving)
2-3 washed and cut up strawberries
1/3 cup lemon juice
1/4 cup sugar
1/4 cup water
ICE to top it all of

Mix together in a blender.

YUM!

9.24.2012

Lunch Salad

Have you noticed that I seem to ONLY make chicken dishes?  Cut this chicken, cook it in these seasonings, add it to this?  Geez, I promise I make plenty other kinds of dishes in my house.  So I'll show you!
This is my favorite salad to make for lunch time.  I think I make it when I'm feeling fat.  Eating lettuce makes me feel skinny.  Except I'm positive the dressing I smother on top isn't a fat burner :)

Yummy Lunch Salad
Chopped romaine lettuce
Cubed sharp cheddar cheese
Diced Gala apples
Brianna's Poppy seed dressing (picture with the peach on it!)
Mix it all up and enjoy.

*ALSO, my friend Caley made some special requests for fast, on the go breakfasts. (which are coming, Caley!)  So now I'm going to ask you - what kind of food would YOU like to see on the blog?

9.21.2012

Follower Friday: Taco Soup

Happy Freaking Friday!
Heather, one of my followers, was chosen to share a recipe today.  Heather and I went to the same high school - go Broncos!  We sang in the Madrigal Choir together.  An all girl choir was way too much fun!  She is an absolute sweetheart.  I won't share too much about her because she wrote a nice little bio herself.  Take it away, Heather!
 
---------------------------------------------------------------------------------------------------

My name is Heather. I am married to Thomas. We have two sweet kids, Eleanor (3) and Thomas (1). We also have a little boy on the way. I love to cook and bake. It is one of my favorite things to do! I hardly ever follow recipes and tweak pretty much every recipe I make. I have a food blog and would love some more followers. I have been a horrible blogger lately between moving, being pregnant and chasing after my two kids, but will be posting another recipe very soon.
 
Check out my blog, Food from the Sellers
 
 
This is one of my favorite recipes. My sweet friend Melissa gave me this recipe and then as usual I tweaked it. Cooler weather is coming and this is perfect for one of those cool days. I hope you enjoy this as much as I have! (At the end I included a homemade tortilla chips recipe. I don't remember where it came from, but my family loves them.)
 
Taco Soup
(based off of a recipe from Melissa Borders)
1 onion
2 lbs hamburger
3 packages of ranch dressing powder
2 packages taco seasoning
2 cans corn-drained
1 can pinto beans
2 cans black beans
1 can red kidney beans
1 can diced tomatoes
1 can tomatoes with chilies
 
Brown hamburger. Then add onions, 2 ranch dressing powder and 1 taco seasoning. Cook until the onions are translucent.

Put in crock pot. Add all beans, tomatoes, corn, taco seasoning packet and ranch dressing packet. Cook on low for 4-6 hours.
Serve with sour cream, cheese and homemade tortilla chips (see below for recipe). Enjoy!
Homemade Tortilla Chips
corn tortillas
vegetable cooking spray
salt (if desired)


Spray cookie sheet with cooking spray. Cut corn tortilla chips into to desired shape (we cut ours into strips) and place on cooking sheet. Spray the top of the tortillas with cooking spray. Sprinkle with salt. Place in the oven and cook for 10-20 minutes at 425. Be sure to check often, they burn easily. Serve over taco soup.

9.19.2012

The BEST Pancakes

We love breakfast.  Specifically pancakes.  And pancakes is my backup dinner.  When Dad isn't going to be home for dinner, we have pancakes.  When I can't think of anything to make for dinner, we have pancakes.  It's all about pancakes.  This is the recipe I use for pancakes.  I stole it from my sister, Stehanie.  They're easy to whip up and it makes enough pancakes for our family of four plus some.  

Pancakes/Waffles
1 egg
1 cup milk
1/3 cup oil
pinch of salt
2 tsp. baking powder
heaping 1/2 T of sugar
1 cup flour

Mix all ingredients together.

 Pour onto heated griddle or pan...
...okay you know how to make pancakes.
Any leftover pancake mix can be stored in the fridge for only 24 hours.  Have pancakes again for breakfast :)

We also love homemade syrup.  You might like it but are afraid to make it.  It's cake.  Buy a box of Maple flavoring - it lasts forever!

Syrup
1 cup water
2 cups sugar
1/2 tsp. maple flavoring

Boil 1 cup water.  Add 2 cups sugar.  Stir in.  Once the sugar dissolves, remove saucepan from heat.  Stri in 1/2 tsp maple.  Stir.  The syrup is ready!  The syrup we don't use I just put into a Tupperware and stick it in the fridge.  Unlike the pancakes, the syrup can last forever.

9.17.2012

Pasta Primavera

This is one of my favorite summer meals.  It's light and filled with summer veggies. 
My sister, Rachelle gave me the recipe.

Pasta Primavera
8 oz of pasta of your choice
1 zucchini or yellow squash
1 pepper (red, orange, yellow or green)
3-4 roma tomatoes
4-5 T. of olive oil
salt & pepper
Italian seasoning
Parmesan cheese
*If you add a variety of squash/peppers, it helps with the flavor and color.  
Sometimes when I have them, I cut up half of each squash and a few different peppers.

Preheat oven to 400 degrees.  Boil water for pasta. Wash and slice veggies. 
You can slice them in long strips or in chunks.  Pour olive oil onto a cookie sheet.

Place cut veggies onto the sheet.  Mix them into the olive oil.  Sprinkle on salt, pepper, and Italian seasoning.  Bake for 10 minutes, flipping vegetables halfway through.  Dice tomatoes.  Take a large bowl and dump cooked pasta and vegetables into.  Be sure all of the oil on the pan goes in - it helps add lots of yummy flavor.  Mix. 

Top it all of with fresh tomatoes and Parmesan cheese. 
*How I tweaked it:
We like meat so I cut 2 chicken breasts into strips and cook them in olive oil and Italian seasoning over medium heat. 

I mix the vegetables right into the cooked chicken and steam that for a few minutes.  Then I mix everything together in a large bowl, then top it off with tomatoes and cheese.

Hope you like it!

And just a few reminders:
1- I post new recipes every Monday and Wednesday.  
2- Fridays are special days for my followers!
3- Be sure to follow the blog and email me letting me know you're following.  Then you'll have the chance to post one of your recipes.

9.14.2012

Follower Friday: Cinnamon Rolls

FOLLOWER FRIDAY!!!  
In case you are NEW, let me explain.  Every Friday I choose one of my followers to do a guest post.  That special follower gets to choose something to share - an entree, dessert, drink, ANYTHING - and tell us all about it.  (Are you following this blog yet?)  It's pretty exciting - maybe more for me?  I love to get new recipes.  And it's fun to have my friends/followers support this crazy food blog idea of mine :)

Today it's Lauren's day.  She made a personal request in a comment to do Follower Friday.  I can't resist requests. (so go ahead, ask away!)  Lauren and I go way back to when we were studying Special Education at BYU-Idaho.  (what, what?!)  We met in a WICKED hard class.  Our teacher was amazing, but it still didn't make the class any easier.  From the moment I met Lauren, she was someone I admired.  I remembered how vibrant and happy she always was. (and I'm sure still is)  I admired her ability to wake up before class to run!  I also admired how much time she took to understand the information in classes; something I struggled with.  She's now a mommy of two beautiful girls and still has the time to blog about them, bake yummy things with her girls, and RUN!  Her priorities are definitely in order.  Lauren it's all yours!

-------------------------------------------------------------------------------------------

I think cinnamon rolls are a breakfast food.  My husband thinks they are dessert.  So we compromise and eat them in the morning, noon and night.  What could be better? These are the EASIEST cinnamon rolls you will ever find.  And I swear they are fool proof.  If you are a beginner or seasoned cook these will soon be in your pile of favorites. The best thing about these cinnamon rolls is that after they are cooked and frosted, I individually wrap each one in plastic wrap and stick them in the freezer.  If we want one, we get it out, pop it in the microwave for a minute and we have an oven-fresh roll in seconds!  Hope you all enjoy! These are the BEST and most SIMPLE cinnamon rolls around!  I have loved making these for pre-wedding breakfasts, family, reunions, and for everyday.  
Cinnamon Rolls 
 You will need: 1/2 cup water (hot) 2 Tablespoons Yeast 8 cups flour 1/2 cup sugar 1 lb of butter (4 sticks) 2 cups milk (any kind) Filling: 1//4 cup butter 2 tsp. cinnamon 1/2 cup sugar Frosting: 1/2 cup butter 1 tsp vanilla Splash of milk 5-6 cups of powdered sugar 

1) Use a liquid measuring cup and measure out 1/2 cup hot water from the faucet.  Add 2 T yeast.  Stir slightly and set aside. 
2) Measure 5 cups of flour and the 1/2 cup of sugar into a mixing bowl.  

3)Add 1 pound of butter, room temperature.

4) Cut the butter (using a pastry blender or fork) into the flour and sugar.  You should get a crumbly texture.

5) Add 2 cups of milk and yeast mixture and mix till all your dough is moistened.

6) Add the remaining 3 cups of flour.  Mix till there is no dry flour mixture.
7) Transfer your dough to a greased bowl and cover with plastic.

8) Refrigerate at least 4 hours or up to 24 hours.
9) Sprinkle a  little flour on the counter and divide the dough in half.  Roll it into a cylinder.

10) Use a rolling pin and roll it into a large square about 1/4 inch thick. 

11) Make mixture: 1/2 cup sugar, 2 tsp. cinnamon in one bowl.  Also melt 1/4 cup butter in a separate cup.
12) Spread 1 half of the melted butter evenly over the rectangle.  Then sprinkle half of the cinnamon sugar mixture over the melted butter.

13) Roll it up!

14) Cut it into 10-12 sliced with a knife (or floss!)

15) Place on a greased cookie sheet and press down on each piece.

16) Repeat with other half of dough.
17) Bake at 350 degrees for 13-15 minutes.  Let cool.  Then make frosting and enjoy!
--------------------------------------------------------------------------------- 

You should make these cinnamon rolls this weekend!
Thanks Lauren!

9.12.2012

Banana Bread

We love bananas in our house.  Cut up in cereal, smeared with peanut butter or just plain.  Sometimes I purposely buy them just to make banana bread.  I'm sure you have your favorite recipe.  I actually googled "banana bread recipe" when I couldn't get a hold of my Mom one time.  This was the recipe I chose first.  And...it's the greatest recipe of all time.  (probably due to the full cup of sugar!)

Banana Bread
(recipe from here)

3-4 ripe bananas
1/3 c. melted butter
1 cup sugar
1 egg, beaten
1 tsp. vanilla
1 tsp. baking soda
pinch of salt
1 1/2 cup flour

Preheat the oven to 350 degrees.  Grease bread pan or fill 2 muffin pans with liners.  Smash the bananas and mix with melted butter.  Mix in sugar, egg and vanilla.  Sprinkle the soda and salt over the mixture.  Add the flour and mix.  Pour batter into desired pan.

Bread: 50-60 minutes
Muffins: 12-15 minutes
*And usually I add 1/2 c of semi-sweet chocolate chips to the batter.  
You should too.

So, set 3 bananas aside to get extra ripe!

9.10.2012

Acapulco Chicken and I need your email!

Alright everyone, before we get into another recipe, I have a huge favor.  I'm having a little trouble getting a hold of my followers because a lot of your profiles DON'T have your email address.  So, would you PLEASE send an email to willtherebefoodthere@gmail.com?  That way I can easily ask you to share one of your favorites.  Thanks - I'd really appreciate it.

- - - - - - - - - - - - - - - - - - - - - -

Okay...here we go.

Acapulco Chicken
(recipe from here - I tweaked it slightly)

2 chicken breasts
1/2 cup chopped onion
1/2 cup chopped green pepper
1 roma tomato
1 T. olive oil
1 T. chili powder
1 teas. garlic salt
Extras: sour cream, jalepeno pepper, hot sauce

Cut chicken breasts into small slices. Cover with chili powder. Cook chicken in pan with heated oil.


Add peppers, onions, tomatoes, and any other veggies you desire (jalapeno pepper).  Add garlic salt and a little more chili powder (& 10 drops of hot sauce).  Cook for 5 minutes occasionally stirring.
I usually add more onions, peppers and tomatoes.  But this was all I had left in the fridge!

Cover and simmer for 5-10 minutes.  


Pour over a generous helping of rice or in a tortilla shell.  I like to add sour cream to the mixture if I'm putting it over rice - it makes a creamy sauce.  And if you're putting it in a tortilla, just put sour cream on the tortilla.
And it's usually WAY more colorful....but again, missing half of the veggies.
 Roll and eat!

9.07.2012

Follower Friday: The Only Lasagna Recipe You'll Ever Need

TGIF!!  I am in love with Fridays.  The start of the weekend and another Follower Friday. 
Today I chose my friend, Kimberly to share a recipe.  She's kind of one of my favorite people.  We met when we were both single and teaching.  Instant friends.  We would have been roommates, if it hadn't been for the men we each fell in love with and decided to marry.  She is insanely talented - she's everything I wish I was.  She's an amazing cook, designer, and Mom.  Check out her blogs.
Personal blog: here.
 Design blog: here.
Food blog: here.
Kim - it's all yours!
----------------------------------------------------------------------------------------

Thanks for having me today Tiffanie!!  I've been excited to share a recipe since you first asked me, I just didn't know what to share!  But then this post on Honest Toddler (if your a mom--or even if you aren't--you will love HT) caught my eye at a moment of extreme hunger (pregnancy + 3 hours without eating) and I remembered my awesome lasagna recipe.  Its an adaptation of my aunt Barbara's lasagna recipe that my mom has been making since I can remember.  I've changed a lot of it, but the same basic form and ingredients are the same.  What I love most about this recipe is that you don't have to cook the noodles before you bake it.  (I know, I know there are those "no cook lasagna noodles" but I've never tried them and with this recipe I'll never need to)

What I'm most excited about is that YOU can use this same format and make lasagna exactly how you want!  So this is more than just a recipe for my lasagna, its a "choose your own adventure lasagna dinner"!  Basically it consists of four layers.  I'll list the ingredients and put a star next to the ones you can change or omit.
All I need for great lasagna!

Noodles
Regular lasagna noodles (one 8oz box was not quite enough for me, so you might want to get a bigger box or get two!)

Sauce
24 oz. can marinara sauce * (When I'm feeling fancy I make my own sauce from scratch.  When I'm not I use Hunt's Traditional.  You can use any brand, any flavor, just make sure you use 24 oz.  I've never used a white sauce but I don't see why you can't!!)
1 onion*
1 zucchini, chopped very small*
8 oz mushrooms, chopped*
half of a 16 oz bag of frozen spinach*
(other ingredients that would be yummy: ground sausage, ground beef, ground turkey, chopped carrots, chopped tomatoes, corn, bell peppers. . . the list goes on and on)

Soft cheese
20 oz ricotta cheese * (my aunt's recipe called for 16 oz cottage cheese and 3oz of cream cheese combined)

Grated cheese
4 c grated mozzarella cheese* (mozzarella is traditional, but feel free to think outside of the box here!)
a sprinkle of Parmesan cheese*

Directions:
1. The first thing, the VERY FIRST THING, you must do is put a small amount of your sauce on the bottom of a 9x13 pan.  This is pretty much like greasing and flouring your cake pan.  Fail to do this and you will lose the bottom layer of noodles to the demons of cooked on food.  About 2-3 T will do, spread very thin.  If you can see your pan through the sauce, you've done it right.
This is what it should look like.  Unless you're using a metal pan, in which case seeing the counter top through the sauce is bad.

2.  Then prepare the layers.
Noodles: open the box

Sauce: Begin by putting the onion in a medium hot pan.

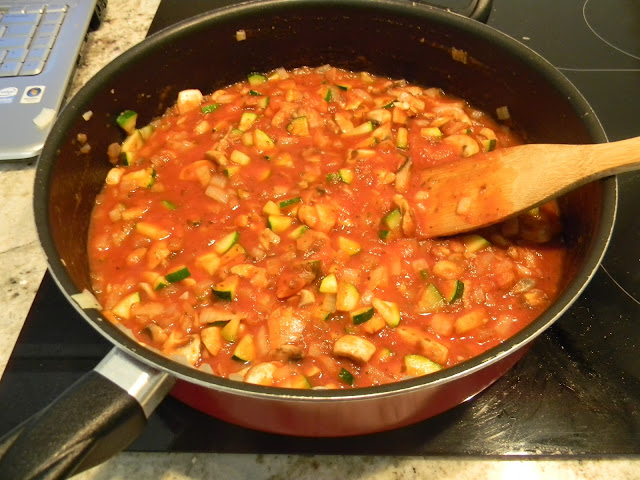
While the onion gets some one on one time with the heat, I finish chopping the other veggies, in this case zucchini and mushrooms.  If you're adding a ground meat, brown the meat with the onion to help the flavors really marry.  Cook all the veggies until a little soft.  Remember, they're going to get plenty of cooking time in the oven, but you want to make sure no one gets a crunchy onion so I like to give them a head start.

Add the sauce.

At this point you'll probably remember you had frozen spinach melting on the counter.  Don't worry, the freezing process has already wilted the spinach so it doesn't need any additional cooking, go ahead and add it now.


Soft cheese: Ricotta is not very creamy when you scoop it out of the container, so I like to add a few tablespoons of milk to help it spread better.  See the difference?

 
Grated cheese: I end up using about 1 1/2 c - 2 c of cheese for each of the two layers.  If you buy the cheese pre-grated this step is super easy.

3. Then layer away!!
I say, fit the noodles in how ever you can make it work.  Space too small for a whole noodle?  Shatter that sucker and put it together like a puzzle.
Spread about half your sauce mixture over the noodles.  No need to measure out half, this isn't baking!!
Even with the milk, that ricotta can be a beast to spread.  Putting small spoonfuls helps ensure you don't mix the sauce and cheese into a pink mess.  But if you do, it will still taste good!
And here it is spread out.
Sprinkle cheese.
And start over!
Once the layers have been repeated, cover this masterpiece in foil!

4.  Cook for 1 hr and 15 min with foil on at 350.  Remove foil (carefully so you don't remove the melty yummy cheesy goodness with it) and cook an additional 15 minutes.  Let sit for 15 minutes before serving.

5.  Serve with a green salad and garlic bread.  Or what ever you want to serve it with, I'm not giving out grades on this. . .
Pin me.  You know you want to. . .

---------------------------------------------------------------------------------

Like she said....pin it.  Happy weekend! :)